Christmas will be here soon so I decided to get started on gifts for all my friends now. These letters started life out as scrap from an architecture class project. I had to do some cutting to remake a couple of the letters but the eventual goal is to detail each letter and put it into a matted frame for each of my closest friends.
Monday, September 30, 2013
Thursday, September 5, 2013
Tire clock refurbish
Another project from the past (not much happening right now since I'm getting settled back into school). I found this clock in a gift shop on the discount rack, someone had bought it, taken it apart and kept some pieces and returned it to the store. When I got it it was missing all three hands, a face and the clock mechanism itself, I think it cost about 5 bucks. It still had the rim, tire and neon ring which you'll see later. My next step was to buy a cheap clock at Walmart which ran me around $7.

I decided not to use both hands as they were and instead use the brake disk as the hour hand, to do this I unscrewed it from the base and cut the ring off of it with a razor saw then ground down the remnant with my Dremel tool.
There were numerous pegs and screw holed that had to be sanded down so they wouldn't interfere with the clocks opperation
The previously silver brake caliper was painted red to stand out and I made spacers to hold it above the rotating brake disk. It blocks the red hour hand tick for a couple of hours but I don't necessarily use this clock to tell time. Finally, I got on Photoshop and made a clock face that would adequately glow under the neon ring.

I decided not to use both hands as they were and instead use the brake disk as the hour hand, to do this I unscrewed it from the base and cut the ring off of it with a razor saw then ground down the remnant with my Dremel tool.
The minute hand was too long so it got cut and sanded down. The hour hand got cut away from the ring and discarded, the ring that attaches to the clock stem was beveled to fit into the hole in the brake disk then was epoxied into place, I put a simple red mark on the disk to denote the "hour hand".
The clock mechanism, though the same size, didn't have the correct mounting points so I had to improvise. Also, since the stem was too short I had to set it back slightly so the hands would turn behind the rim instead of in front like the original clock. In order for the hour hand to not rub the base the spacing had to be very exact, I achieved this by sanding down the strips that held it in place.
The previously silver brake caliper was painted red to stand out and I made spacers to hold it above the rotating brake disk. It blocks the red hour hand tick for a couple of hours but I don't necessarily use this clock to tell time. Finally, I got on Photoshop and made a clock face that would adequately glow under the neon ring.
Here is the final product once I got all of the quirks worked out of it. Sorry, the cord that I use to power the neon ring also runs a battery charger and they both got lost in the move, I'll post a pic of the lit clock later.
Saturday, August 24, 2013
Mini Photoshop project
Back tracking to something I did a while back for my parents (who are missionaries in Africa). It is a Photoshop creation I did for the cover of their bood. It is made up of four elements: fire, the earth, a photo of a dead tree and clouds. I got the idea from another picture I had seen elsewhere. (my version is way better.) There really are no fancy tricks here, just some layering and masking.
Red brake calipers
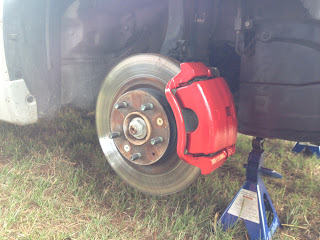
Sorry for the long absence but I was out of town for a while then had to do a lot of catching up when I got back so I only just now am getting back to my projects. Took today out to spend time with an old friend and help paint his brake calipers. This was a simple task of taking off the wheels and masking everything to prevent over-spray. We used VHT high temp spray paint from Auto Zone with aluminum foil and duck tape for masking. Masking is important, over-spray can gum up the brakes and be dangerous, the foil is very nice because it keeps whatever form you bend it into without having to tape it down.
Saturday, August 3, 2013
Map update
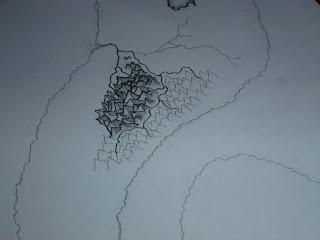
Making good progress on the map drawing, a completed mountain range and one in progress as well as the beginnings of my map compass. I now know why compasses got so elaborate on old maps. If you just spent a half hour drawing a hundred little mountains you get a little bored of it and feel like venting your creativity on something else, hence the worked and reworked compass. I'm glad I started this though, the splotchy red paint on the F1 car is driving me nuts and I need something to do while I work out a solution.
Thursday, August 1, 2013
Old map drawing
The story of my life, barely get one project started before I start on another one. I watched a documentary about old maps and that got me interested in them. So then I watched some videos people have posted about how they draw old style maps and that got me more interested so here is my attempt. First off I did some very light, wandering lines to outline the continents (too light to photograph) then I started giving them coast lines. I held the pencil at an odd angle and pushed instead of pulling to make the lines more random and natural then added some lakes and rivers. Not sure whats next but It's fun so far.
Having some issues with the bottle of Ferrari Red paint I was going to use for the F2001, it's very old. Once I get that sorted you'll see some new updates.
Having some issues with the bottle of Ferrari Red paint I was going to use for the F2001, it's very old. Once I get that sorted you'll see some new updates.
Monday, July 29, 2013
Display cases
Got my shipment of display cases in today. This is something I have wanted to do for a while, get all of my cars out of the dust. The original plan was to buy one case at a time but at $10.98 a piece that would get expensive fast so I started searching around online and came across Pioneer Plastics which sells cases of all sizes in bulk. I bought a box of 12 cases and it cost just under $5 each, now almost all of my cars are in cases. As I build more cars I'll cycle the older, crappier ones out and eventually get another shipment but for now I'm set. Now I just have to get them all cleaned and presentable.
Update on the Ferrari F2001 coming soon.
Update on the Ferrari F2001 coming soon.
Subscribe to:
Posts (Atom)


