
Saturday, December 28, 2013
Christmas drawing
Hello every one, it is so nice to be back from 'most' of the holidays. Of course there is still new years to go but maybe I can get some new posts on here. I have finished the F1 car at last so look forward to a full write up on it shortly. This is a quick holiday blurb to show a mini project. On Christmas eve I was given a piece of paper and told to "draw a name card" for my cousins gift, who likes to hunt. They asked, they received. Happy Holidays everybody!!

Tuesday, December 10, 2013
Monogram letter update
A brief update on the wooden monogram pictures I am building for my friend's Christmas presents. I am trying to make each one unique and in that quest decided to make my room mates letter with an Elven pattern, so I sat down with masking tape, an Exacto knife and a Sharpie to replicate the design I found online. I started watching Captain America and by the end of the Avengers I was finished, this was a long process. By cutting around the pattern and removing the "field" and coloring over the exposed wood I made a negative of the pattern. I then went in with a detail pen to draw the lines that make the overlapping effect. And finally, placed it in its frame, there may be some work given to the blue background later. More about the other letters to come.


Saturday, November 23, 2013
Horten Ho229
I knew that Revell Monogram had a splinter company called Revell of Germany for a few years but what I never considered was that Revell of Germany would have different kits than the American company. I was researching other kits on Amazon and I came across a bunch of kits by Revell of Germany, needless to say several of them ended up on my Amazon wish list. This kit, the Horten flying wing, was a kit I had seen built years ago but never found it. I went ahead and bought it to round out an order to get free shipping. This is the first airplane I have built with the intention of airbrushing it, I'm getting more adventurous since my recent success.
I started by joining wing halves then spraying all the external parts a base aircraft grey, this will act as both primer and camouflage color for the final paint scheme. Next I assembled the cockpit in the "fuselage" half, there wasn't much to do there and the canopy will obscure most of it but still a place for detailing. There are still some internal things to put together before the body halves go together but an initial test fit works well.


I started by joining wing halves then spraying all the external parts a base aircraft grey, this will act as both primer and camouflage color for the final paint scheme. Next I assembled the cockpit in the "fuselage" half, there wasn't much to do there and the canopy will obscure most of it but still a place for detailing. There are still some internal things to put together before the body halves go together but an initial test fit works well.


Sunday, November 10, 2013
Playing with my airbrush
In the new hiatus from the F2001 (which I erroneously referred to as the F2000 last time, sorry) I have pulled out an old project. This Millennium Falcon model is an old MPC Ertle kit from '96. I built it not long after it came out but as a kid i put lots of love into it but not much skill. It was left in storage for years and got pulled out and taken apart a couple of years ago. It sat in a box until this week when I decided to throw some of my new-found airbrush techniques at it. This will therefor end up being one big experiment. First thing up was a light grey overspray to cover the old paint job next up the iconic weathering from the movie.


Sunday, November 3, 2013
Engine instal
I've owned my airbrush for almost a year now and I have played with it some but I have not had consistent results. I had seen on that great warehouse of ideas, YouTube, how to "heat color" exhaust tips and decided to try the technique on the F2000 model. My logic was "if I mess it up all I have to do is paint it silver again and the mistake is gone." I started with an assembled and painted exhaust system and masked off the pipes up to the junction point. The first color I sprayed on was a light yellow, it went high up the pipe. Next went a pearl red that had to be cut with water, it went 2/3 as far as the yellow. Finally went on a metallic blue that also had to be cut with water and it was concentrated around the tip but went up as far as the yellow. The last two colors are made by Createx. After the colors dried I pulled of the tape and dabbed matte black inside the pipes. I am very pleased with the outcome and installed them on the engine which is now mounted to the car. And as my Humbrol gloss 19 is dead, I will have to stop until I get more in. Momentum = dead.


Pictures in order:
1) masked and ready to paint
2) left with yellow and red, right in the process of blue
3) finished with all three colors

The pipes on the engine

Where the F2000 will have to wait till I get more paint. Looks good though.

Saturday, November 2, 2013
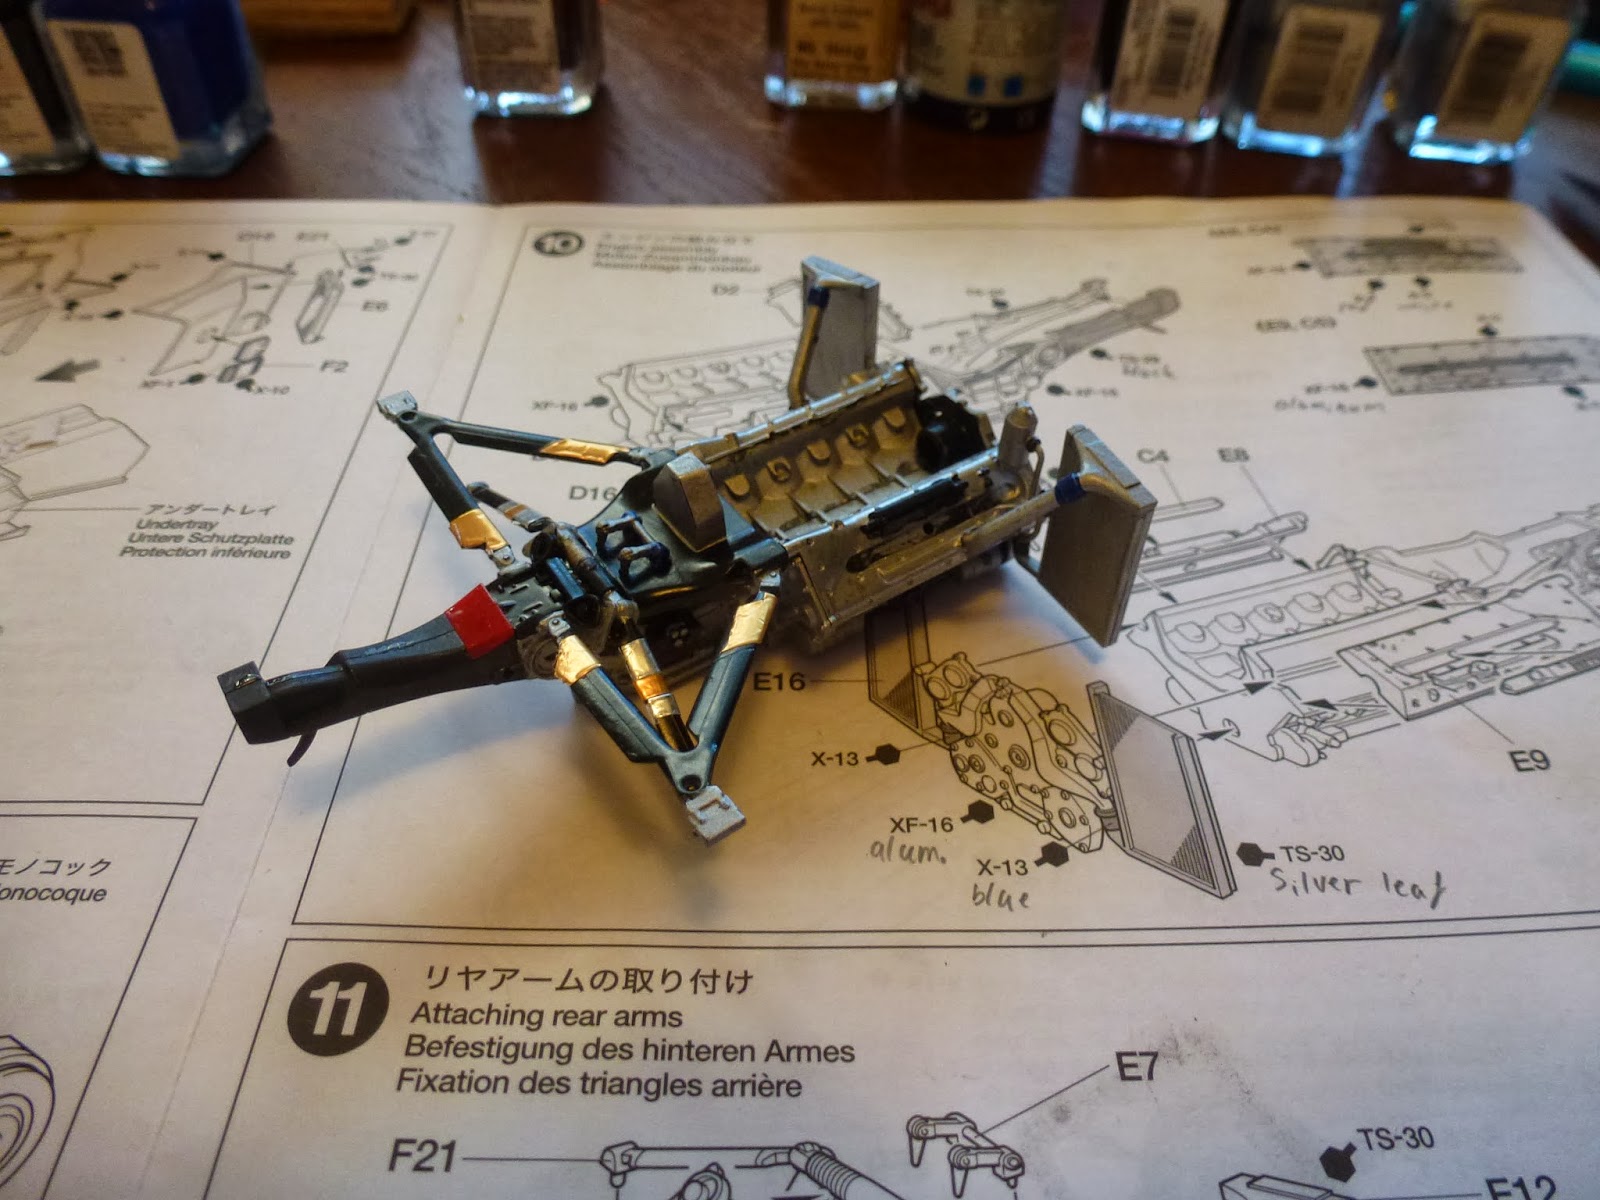
F1 engine
Great news! I'm back to building the F1 car. After a long sabbatical to get squared away in school again I set up the work table and pulled out the model. As of now I have assembled the front suspension and gotten the front portion of the car mounted to the under-chassis. I am in the process of assembling the engine and rear suspension now. However I may hit another wall, the 8 year old Ferrari Red paint I have been using is dying. It has become so thick its like spreading silly putty, I may have to delay until I get some more off line. (It is Humbrol gloss #19 from England). This paint has served me so well though, I believe I have used it in nearly a dozen models including painting 4 full cars with it.


Monday, September 30, 2013
Christmas gifts
Christmas will be here soon so I decided to get started on gifts for all my friends now. These letters started life out as scrap from an architecture class project. I had to do some cutting to remake a couple of the letters but the eventual goal is to detail each letter and put it into a matted frame for each of my closest friends.


Thursday, September 5, 2013
Tire clock refurbish
Another project from the past (not much happening right now since I'm getting settled back into school). I found this clock in a gift shop on the discount rack, someone had bought it, taken it apart and kept some pieces and returned it to the store. When I got it it was missing all three hands, a face and the clock mechanism itself, I think it cost about 5 bucks. It still had the rim, tire and neon ring which you'll see later. My next step was to buy a cheap clock at Walmart which ran me around $7.

I decided not to use both hands as they were and instead use the brake disk as the hour hand, to do this I unscrewed it from the base and cut the ring off of it with a razor saw then ground down the remnant with my Dremel tool.


There were numerous pegs and screw holed that had to be sanded down so they wouldn't interfere with the clocks opperation

The previously silver brake caliper was painted red to stand out and I made spacers to hold it above the rotating brake disk. It blocks the red hour hand tick for a couple of hours but I don't necessarily use this clock to tell time. Finally, I got on Photoshop and made a clock face that would adequately glow under the neon ring.


I decided not to use both hands as they were and instead use the brake disk as the hour hand, to do this I unscrewed it from the base and cut the ring off of it with a razor saw then ground down the remnant with my Dremel tool.
The minute hand was too long so it got cut and sanded down. The hour hand got cut away from the ring and discarded, the ring that attaches to the clock stem was beveled to fit into the hole in the brake disk then was epoxied into place, I put a simple red mark on the disk to denote the "hour hand".
The clock mechanism, though the same size, didn't have the correct mounting points so I had to improvise. Also, since the stem was too short I had to set it back slightly so the hands would turn behind the rim instead of in front like the original clock. In order for the hour hand to not rub the base the spacing had to be very exact, I achieved this by sanding down the strips that held it in place.
The previously silver brake caliper was painted red to stand out and I made spacers to hold it above the rotating brake disk. It blocks the red hour hand tick for a couple of hours but I don't necessarily use this clock to tell time. Finally, I got on Photoshop and made a clock face that would adequately glow under the neon ring.
Here is the final product once I got all of the quirks worked out of it. Sorry, the cord that I use to power the neon ring also runs a battery charger and they both got lost in the move, I'll post a pic of the lit clock later.
Saturday, August 24, 2013
Mini Photoshop project
Back tracking to something I did a while back for my parents (who are missionaries in Africa). It is a Photoshop creation I did for the cover of their bood. It is made up of four elements: fire, the earth, a photo of a dead tree and clouds. I got the idea from another picture I had seen elsewhere. (my version is way better.) There really are no fancy tricks here, just some layering and masking.


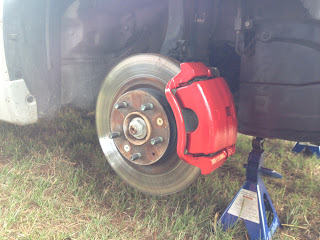
Red brake calipers
Sorry for the long absence but I was out of town for a while then had to do a lot of catching up when I got back so I only just now am getting back to my projects. Took today out to spend time with an old friend and help paint his brake calipers. This was a simple task of taking off the wheels and masking everything to prevent over-spray. We used VHT high temp spray paint from Auto Zone with aluminum foil and duck tape for masking. Masking is important, over-spray can gum up the brakes and be dangerous, the foil is very nice because it keeps whatever form you bend it into without having to tape it down.


Saturday, August 3, 2013
Map update


Thursday, August 1, 2013
Old map drawing

Having some issues with the bottle of Ferrari Red paint I was going to use for the F2001, it's very old. Once I get that sorted you'll see some new updates.
Monday, July 29, 2013
Display cases

Update on the Ferrari F2001 coming soon.
Wednesday, July 24, 2013
F2001 seat

Monday, July 22, 2013
First of the F1 cars

The journey to creativity
I've been kicking around the idea of starting a blog to catalog all of my projects for a while. My room mate keeps telling me I need to do something like this and since and since I have a load of new projects coming up I decided to take the plunge. So this is officially my step by step log of all of my projects, big and small.
Subscribe to:
Comments (Atom)